Ah, the art of perfectly positioning kitchen island pendants – it’s a delicate balance between style and function that can truly elevate your culinary sanctuary. Imagine walking into a space where the lighting just hits right, casting a warm, inviting glow over your sleek countertops and creating an ambiance that whispers, “Come, gather here.” With this visual guide, you’ll soon be a master of pendant placement, crafting a kitchen that’s both practical and undeniably captivating.
Illuminating Allure: Key Considerations for Kitchen Island Pendant Height
Before we dive into the nitty-gritty of pendant positioning, let’s establish some essential groundwork. The height at which you hang your kitchen island pendants isn’t merely an arbitrary decision; it’s a calculated choice that takes into account several crucial factors. First and foremost, we have functionality – these luminaires need to provide ample task lighting for all your culinary adventures, from chopping veggies to rolling out dough. Too high, and you’ll find yourself squinting in shadows; too low, and you risk bumping your head or obstructing your line of sight.
But we can’t overlook aesthetics, either. The pendant heights should complement the overall design scheme of your kitchen, harmonizing with the island’s dimensions, the ceiling height, and the surrounding decor. It’s a delicate balance, but strike that sweet spot, and your pendants will become a focal point that effortlessly ties the entire space together.
Another vital consideration? The ambiance you’re striving to create. Pendants hung at varying heights can cast dramatically different moods – higher fixtures tend to produce a more ambient, diffused glow, while lower-hung pendants offer concentrated task lighting perfect for prep zones. So, ponder the vibe you’re going for – do you crave a cozy, intimate atmosphere or a bright, airy feel? Your pendant placement will play a pivotal role in setting the tone.
Optimal Pendant Placement: Achieving Visual Balance and Functionality
Now, let’s get down to the nitty-gritty. When it comes to pendant placement, there’s a general rule of thumb that serves as a solid starting point: hang your pendants 30 to 36 inches above the surface of your kitchen island. This range ensures ample clearance for tasks while providing optimal illumination without blinding you with glare.
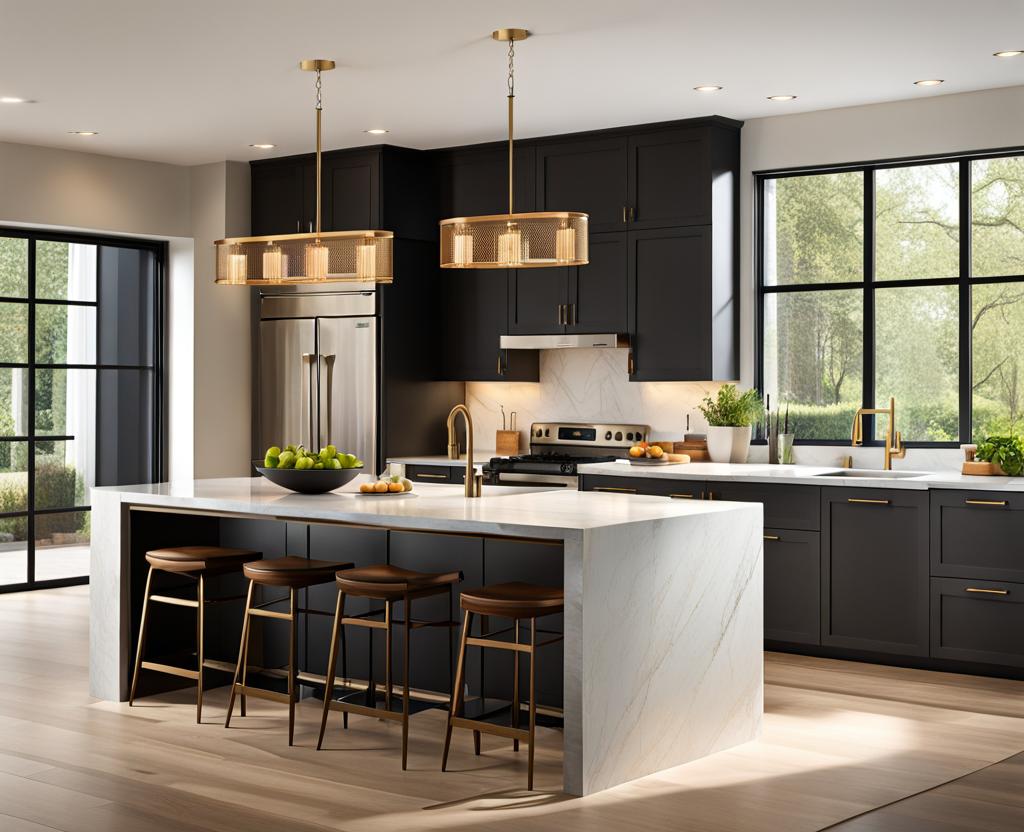
But wait, there’s more! The perfect pendant height also hinges on the overall ceiling height of your kitchen. In spaces with soaring ceilings (9 feet or higher), you’ll want to raise those pendants a bit, aiming for a clearance of 36 to 42 inches. This adjustment helps maintain visual balance and prevents the fixtures from feeling dwarfed by the lofty surroundings.
- Ceiling height under 8 feet: 28-32 inches clearance
- Standard 8-foot ceiling: 30-36 inches clearance
- 9-foot or higher ceiling: 36-42 inches clearance
And let’s not forget about the human element – the height of the tallest person in your household can also influence the ideal pendant placement. After all, you don’t want your favorite chef constantly ducking to avoid a close encounter with a dangling light fixture. A good rule of thumb? Ensure at least 6 inches of clearance between the top of the tallest person’s head and the bottom of the pendant.
Lastly, consider the island’s dimensions and shape. Elongated or irregularly shaped islands may require adjustments to create a visually balanced, evenly illuminated space. In these cases, you might need to vary the pendant heights slightly or even add an extra fixture or two to fill in any dark spots.
Enhancing Kitchen Ambiance: Pendant Size, Style, and Number Guidelines
Alright, you’ve nailed down the height – but wait, there’s more! The size, style, and number of pendants you choose can make or break the overall aesthetic. As a general guideline, larger islands call for bigger, bolder fixtures, while smaller spaces may benefit from a more petite, minimalist approach.
When it comes to the number of pendants, a safe bet is to divide the length of your island by two to determine the appropriate quantity. For example, a 6-foot island would look stunning with a trio of pendants, while a sprawling 10-footer might demand four or five fixtures to ensure even illumination. But don’t be afraid to get creative! Clustered pendants or an asymmetrical arrangement can add visual interest and drama to your kitchen.
And let’s not forget about style! The pendants you choose should harmonize with the overall design scheme of your kitchen, whether you’re aiming for a sleek, contemporary vibe or a rustic, farmhouse feel. Mix and match materials, shapes, and finishes to create a visually stunning display that perfectly complements your culinary oasis.
For a cohesive look, consider tying your pendants in with other lighting elements in the space, such as recessed cans or under-cabinet strips. Coordinating the finishes and styles can create a seamless flow that elevates the entire room’s aesthetic.
Elevating Design Impact: Pendant Height Formulas for Gorgeous Lighting
While the general guidelines we’ve covered will steer you in the right direction, sometimes a more precise approach is required to achieve lighting perfection. Enter the handy pendant height formulas! These mathematical models take into account the diameter of your pendant, the size of your island, and even the height of your countertop to calculate the optimal suspension height.
For instance, the “diameter x 3” formula suggests hanging your pendants at a height equal to three times their diameter. So, a pendant with a 12-inch diameter would ideally be positioned 36 inches above the island surface.
Alternatively, the “room height / 4” approach divides your room’s ceiling height by four to determine the ideal pendant clearance. In a space with a 9-foot ceiling, this would translate to pendants hung approximately 27 inches above the countertop.
But wait, there’s more! Another nifty formula takes into account the length of your island: “island length / 12 + 30.” So, for a 6-foot island, you’d aim for pendants suspended around 30 + (72 / 12) = 36 inches above the countertop.
Of course, these formulas are merely guidelines – the true art lies in fine-tuning the heights to suit your specific space and design vision. But armed with these calculations, you’ll be well on your way to creating a kitchen island lighting scheme that’s both practical and visually stunning.
Layering Lighting for a Showstopping Kitchen
While pendant lights are undoubtedly the stars of the show when it comes to kitchen island illumination, they shouldn’t be the only actors on the stage. To create a truly captivating space, consider layering various lighting sources for a well-rounded, multi-dimensional effect.
Start by incorporating ambient lighting, such as recessed cans or flush-mount fixtures, to provide overall illumination and set the mood. Then, strategically place task lighting (like under-cabinet strips or concentrated pendants) in areas where you’ll be prepping, cooking, or entertaining guests.
Don’t forget about accent lighting, either! Uplights, downlights, or even strategically placed LED strips can highlight architectural features, accent artwork, or create intriguing shadowing effects that add depth and drama to your kitchen.
By layering these various lighting sources, you’ll not only create a functional, well-lit space but also a visually stunning environment that’s sure to impress. And who knows? With the right lighting scheme, your kitchen might just become the new hot spot for gatherings and dinner parties.
Speaking of mood lighting, one crucial element that can take your kitchen island lighting to the next level is dimmability. Installing dimmable pendants (or integrating them into a broader dimming system) allows you to effortlessly transition from bright, functional task lighting to a warm, ambient glow that sets the stage for intimate dinners or cozy evenings.
But dimming isn’t just about creating a romantic atmosphere – it’s also a practical tool that can help you conserve energy and extend the lifespan of your bulbs. By dialing down the brightness when you don’t need full illumination, you’ll be doing your part for the environment (and your wallet).
When it comes to dimming, there are a few tips to keep in mind. First, ensure that your chosen pendants are compatible with your dimming system – not all bulbs and fixtures play nicely with dimmers. Additionally, consider investing in smart dimming technology that allows you to control your lighting with voice commands, a mobile app, or even preset schedules.
Finally, don’t be afraid to experiment with different dimming levels to create the perfect ambiance for any occasion. A soft, warm glow might be ideal for a romantic dinner, while a brighter setting could be better suited for entertaining or task-oriented activities. With a little practice, you’ll soon be a master of mood lighting, able to transform your kitchen island into a chameleon-like space that adapts to your every whim.

This is where you’ll find inspiration to create a stylish and beautiful dream home.